Provides a detailed discussion of the Jalopy settings system and all available options to configure formatting output.
Jalopy stores all settings below its own settings directory. This directory is normally located under the user home directory and shared by all provided plug-ins. The table below shows the typical locations for the common operating systems.
Table 2.1. Typical settings directories for user “John Doo”
| Operating System | Jalopy Settings Directory |
|---|---|
| Linux | /home/John Doo/.jalopy/ |
| Mac OS X | /Users/John Doo/.jalopy/ |
| Solaris | /export/home/John Doo/.jalopy/ |
| Windows Vista/7 | C:\Users\John Doo\.jalopy\ |
| Windows XP | C:\Documents and Settings\John Doo\.jalopy\ |
Substitute “John Doo” with your user name. Please consult your operating system documentation if your system uses different paths for the user directories.
In order to provide version interoperability between releases, the settings of
each release are stored in subdirectories named after the version number of an
individual release, e.g.
C:\Users\John Doo\.jalopy\1.9.4\.
Each settings configuration uses a distinct folder, e.g. the default settings
for user John Doo (on Windows Vista/7) are stored in
C:\Users\John Doo\.jalopy\1.9.4\default\.
A settings configuration is called a profile and stores the actual code convention as well as user-specific data like file and dialog histories. See Section 2.1.1.1, “Main window” for more information. Please note that you can always use settings of prior versions with the most recent release, but it is generally not recommended nor supported to try vice-versa, as there is no guarantee that it will work this way round. Wizard installation will let you update your settings automatically when upgrading, see Section 1.3, “Wizard Installation”. Code convention related settings are usually shared using a textual XML format, see Section 2.1.1.11, “Export code convention” for more information.
If need be, you can reconfigure the root directory to your own liking by pointing the Java system property “triemax.jalopy.home” to the folder name where settings should be stored. The Java launcher provides the standard -D option to define system properties. If the path is a string that contains spaces, you must enclose it with double quotes:
% java -Dtriemax.jalopy.home="/Users/John/Library/Application Support/Jalopy" [...]
When using an IDE or build tool, you might be required to use a different mechanism to define system properties. Please refer to the user documentation of the tool vendor for specific instructions.
Settings are stored in binary files, that are not directly editable. Instead, a graphical user interface with a preview facility is provided to let you easily explore and configure the settings. The GUI consists of several individual windows that can be freely arranged on your desktop. The Main window provides profile management and is the only window that appears after program start. From there you can access all other windows, namely the Configuration window to edit all formatting options, the Preview window that gives you immediate feedback reflecting the current settings, and the Help window that assists you at any time with complete documentation. The GUI may be either invoked directly on the command-line or from within your IDE. Please refer to the individual plug-in chapters in Part II, “Plug-ins” for information on how to display it from the application you’re using.
The Main window is the first window that appears and provides the means to manage several code convention profiles. Please note that when using one of the IDE plug-ins, the contents of the Main window will be integrated into the IDE preferences dialog and therefore the appearance somewhat differs from application to application. The Main window always appears centered on the same monitor where it was invoked from.
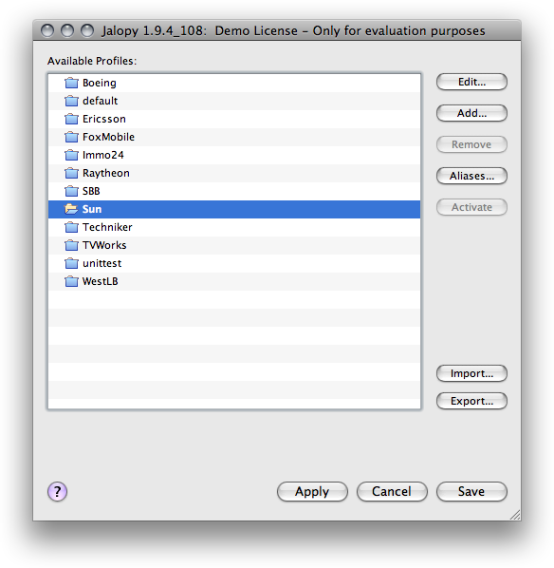
As explained in Section 2.1, “Overview”, Jalopy stores code convention settings in profiles. The list component displays all currently known profiles. Click an entry to see what actions are available. Depending on the state and type of a profile, not all actions might be available all the time.
In Figure 2.1, “Main window” above, the active profile is selected and therefore the removal and activation buttons are deactivated. Editing, adding, importing and exporting is always possible.
Button bar
The Main window provides a button bar at the bottom that lets you perform different actions.
Help
The Help button displays the online help window. The keyboard shortcut for this action is F1. Please note that the help button is only available if the online help has been installed as outlined in the “Installation instructions”.
Save
The Save button lets you persist any unsaved changes made during a configuration session and closes the Main window.
Cancel
The Cancel button closes the Main window but any unsaved settings changes made during a configuration session are ignored.
Apply
The Apply button persists any unsaved changes made during a configuration session.
The Configuration window provides a tree view on the left that lets you navigate between the different preferences screens; and the current preference screen displayed on the right that provides the actual options to configure the current profile. As a hint, the name of the current profile is displayed at the top left, above the tree. The Configuration window is invoked from the Main window by pressing the Edit.. button and automatically restores its position from the last session.
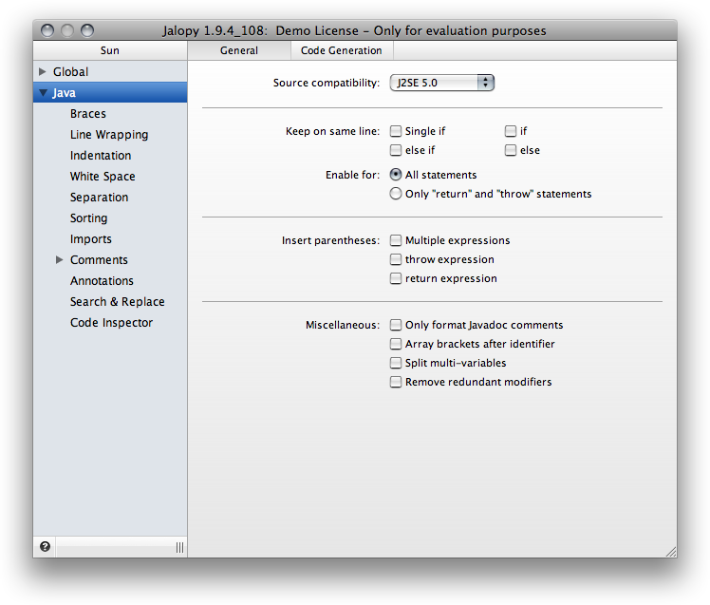
To navigate between the different available screens, you can use the tree view on the left that provides access to all screens or you can cycle between the different screens by pressing Ctrl+Left (previous screen) or Ctrl+Right (next screen). On Mac OS X you use Cmd+Left and Cmd+Right instead.
Closing the Configuration window does not alter your profile. Any changes you might have made are not immediately saved, but temporarily recorded until you explicitly save or apply them from within the Main window
The Preview window provides a sneak preview of the formatting ouput using the currently chosen preferences.
The Preview window normally displays a short sample file that changes with each preference page and only contains elements that would be affected by the options of the active preferences page. But you can display a file of your choice by selecting File → Open... and type or browse the file you wish to be used in the preview. Alternatively, you can simply drag & drop a file to the preview text area. The custom file will then be used for all preferences pages until you explicitly close it via File → Close (which would restore the system preview file), or choose another custom file. It’s also possible to automatically have the currently opened file picked up when using an IDE plug-in. Please refer to Section 2.2.1.1, “Use current file in preview” for more information about this feature.

To visualize the indentation behavior you can control the display of the usually hidden whitespace characters TAB and SPACE and EOL by selecting View → Show Whitespace Characters and/or View → Show EOL Characters. Please note that on Mac OS X the menu actions are available through the global menu bar, while on other platforms the menu is attached to the Preview window.
The build-in examples assume a specific maximum column width of 70 columns as indicated by the gray wrap guide, to illustrate some wrapping behavior. But in order to get a better understanding of the different options and their behavior, you might want to experiment with different wrapping offsets and study their impact. To make this as easy as possible, the Preview window contains a little slider on the bottom right side of the status bar that you can use to adjust the wrapping offset. The wrap guide is also directly draggable.
The Help window lets you browse, search, and print system documentation. Please remember that you might need to install support files manually if the software was not installed using the Setup Wizard. Please refer to Chapter 1, Installation for more information about the installation options.
You invoke the Help window by either pressing the F1 key at any time or by clicking the help button in a window or dialog. Please be aware that the Help window is the most prominent application window and always sits on top of all other windows.
The Help window is directly connected with the current application window or dialog and changes its contents whenever you move the mouse over a widget in the application window or dialog. This way, you are always presented with the most relevant information when working with the application. But the Help window also provides different navigation views to access all available help topics in a more traditional manner. To display or switch views, you can choose one of the available options in the pop-up menu at the bottom left of the Help window.
Content view
The Content view provides a hierarchal tree view of all available help topics. Explore the topic tree to find the information you are looking for. To view a topic, click the link in the topic tree. You can use the Forward and Back buttons in the button bar at the top of the Help window to go to topics you have already visited. They behave the same way back and forward buttons work in an web browser.
Index view
The Index view provides a searchable index of the help contents. Enter a keyword in the search field and successively press the Enter key to display the topics that match the given search term. Directly selecting an entry in the index will display the associated topic.
Favorites view
The Favorites view lets you add and organize bookmarks for topics. You might want to add bookmarks for frequently accessed topics. To add a bookmark you select a help topic in the content view, then switch to the favorites view, open the context menu (right-click the mouse) and select the Add menu item.
To edit an existing profile, select the profile in the list and press the Edit... button. If the selected profile is not the currently active one, the selected profile will be automatically activated. If the settings of the priorly activated profile have been altered, you will be asked whether you want to have your changes persisted before switching.
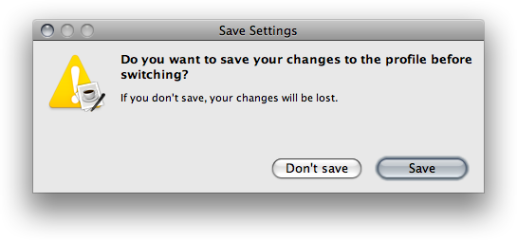
Press the Save button, if your settings should be saved. Otherwise press Don’t save to ignore any chances that were made to the profile. The Configuration window appears along with the Preview window, and here you can alter all available options to configure formatting output. Any changes you make are directly reflected in the Preview window, but you must explicitly save your changes in the Main window. The Configuration window is explained in detail in Section 2.1.1.2, “Configuration window” below.
To add a new profile click the Add... button. A dialog will appear that lets you create the new profile.
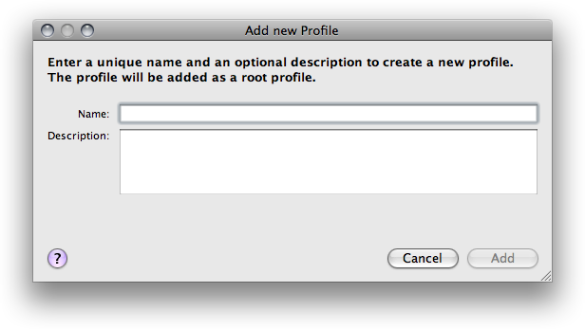
You need to enter the profile name, might add an optional informative description and if a profile is currently selected in the profiles view, you can choose whether you want to create a nested profile by selecting the parent profile. A nested profile will automatically adapt any changes made to its parent profile(s).
Name
The profile name needs to be unique and will be used as the name of the disk folder where all profile information will be stored. Therefore, you should avoid characters that your platform does not allow to be used in file paths.
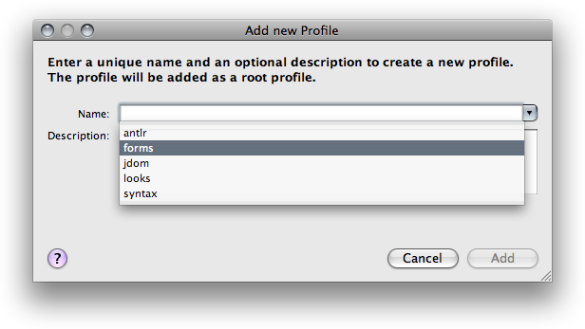
As a convenience, when invoked from within one of the supported IDEs, the dialog provides a combo box with the names of all projects currently available in the IDE that have no corresponding Jalopy profile.
Description
The optional description must be no longer than 256 characters and can be freely chosen. It will be displayed in a tool tip when the mouse is moved over an entry. Name and description are available for inclusion in templates. See Section 2.4.3, “Local variables” for more information.
Parent Profile
In order to provide the ability to easily manage profiles that largely share the same settings, you can create nested profiles. A nested profile will automatically adapt any changes made to its parent profile(s). This feature is only available with Jalopy 1.7 or later.
The typical example would be a number of different projects that should receive the same formatting style, but require different headers. In order to setup such a scenario, you would create a master profile where you configure all shared settings, and afterwards create different nested profiles for each project where you define the individual headers. Later on, if you want to apply any changes to the formatting style of all projects, you would only alter the master profile and the changes will be propagated to the nested profiles automatically.
In order to create a nested profile, simply choose the parent profile here. If you choose “None”, the new profile will be created as a root profile. Please note that this option is only available when a profile is currently selected in the list view. When you add a new profile, the settings of the currently selected profile will be used to create the new profile. If you create a nested profile, the selected profile will be the parent profile. For every profile you define, a new subdirectory is created below the main settings directory where all related files will be stored.
To remove an existing profile, select an entry or multiple entries in the list and press the Remove button. The profile folders will be removed on disk and the selected entries disappear. A profile may only be removed if it is not active. The default profile cannot be removed. Please note that if a selected profile contains any nested profiles, removing the profile will cause all nested profiles to be removed as well!
To activate an existing profile, select an entry in the list and press the Activate button. The stored settings will become active and the preferences dialog updated accordingly.
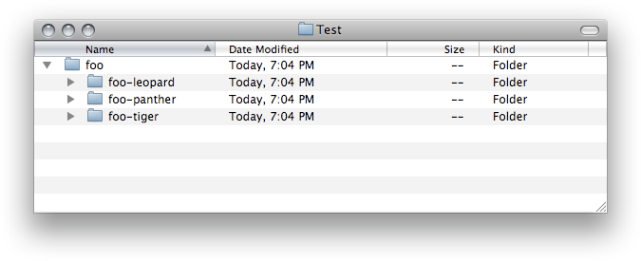
Depending on the type and size of your projects and the provisions of your IDE, it might be necessary to create several project modules in order to manage your codebase efficiently. In such a case all related modules should still receive the same code style.
To achieve and manage such a uniform style easily, you can map modules to one (logical) Jalopy profile that defines the code style. Make sure that the Auto-switch feature (see below) is enabled and Jalopy will automatically use the correct settings for each module. Say you have a project “foo” which consists of three modules.
To map these modules to one Jalopy profile, choose the target profile in the list and press the Aliases... button. A dialog will be displayed that shows all defined aliases for the profile and lets you alter the alias definitions.
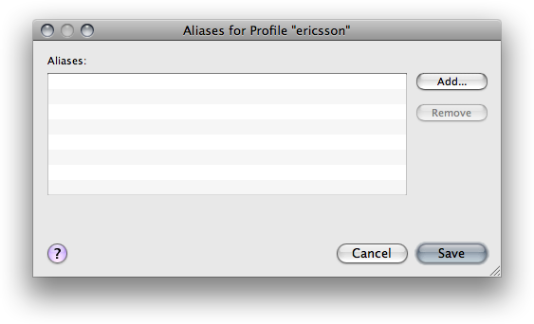
Press the Add... button to add a new alias for the profile.
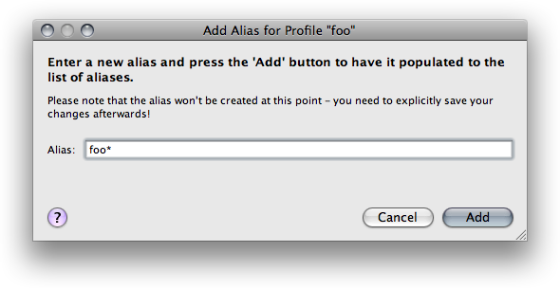
You can either add the names of all modules as new aliases or when the modules share a common prefix—like in our example—use a wildcard alias to point to all modules in just one step. Simply put the * wildcard after the prefix and press the Add button. The alias is then displayed on the list, but has not yet been created. You need to explicitly press the Save button to have your changes applied and any new aliases created or existing aliases removed.
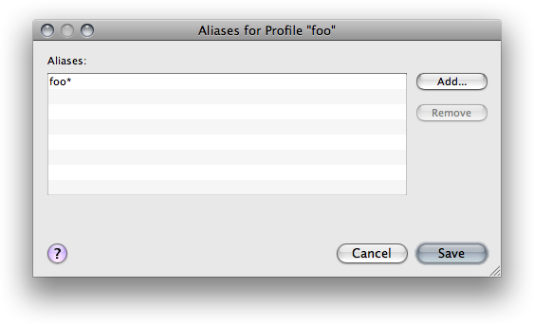
Press the Save button to save your changes or Cancel if you want to ignore any changes. Please note that the alias information of a profile is displayed as part of the tooltip (in square brackets). Move the mouse over a list entry, and the tooltip will appear shortly.
Since 1.2
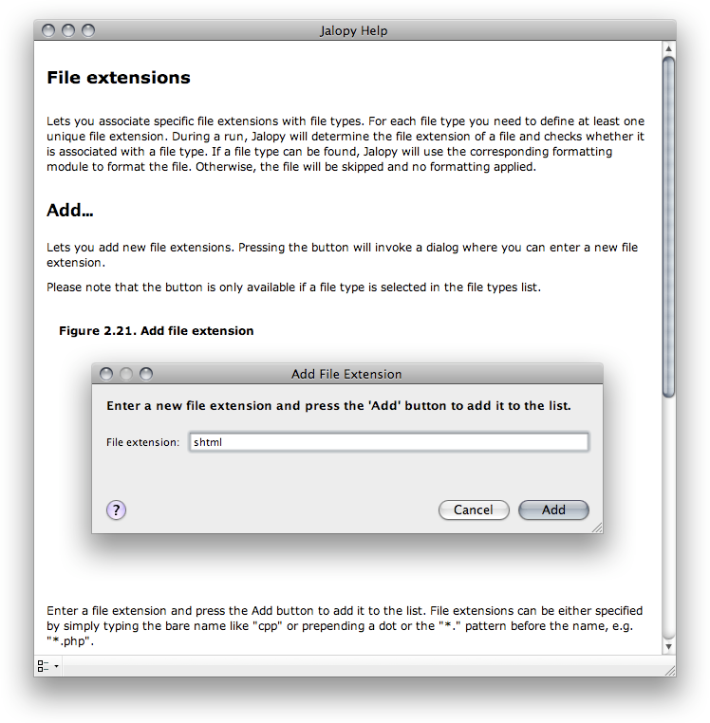
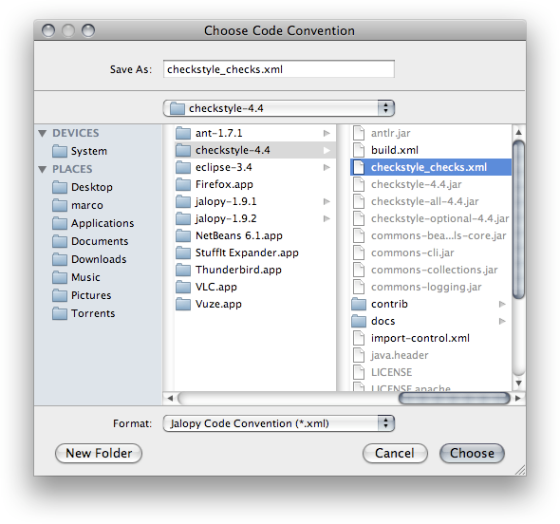
Use the Import... button to import an already-saved code
convention. Since version 1.6, Jalopy also supports importing of Checkstyle
configurations (version 3.5 or later).
Jalopy is able to import code conventions from both local and distributed
locations. Just specify a valid Internet address
(either starting with http://, https:// or www.)
for the latter.
Since Jalopy 1.7, exported code conventions store the names of their profile. During import it is therefore possible to recreate the profile structure. When importing a single convention, if the associated profile does not already exist, you will be asked whether it should be created and the settings imported into this profile. Otherwise, settings will be imported into the currently active profile. Checkstyle configurations will always be imported into the currently active profile. Importing a file that contains several code conventions, will always recreate the original profiles if they should not already exist.
Versions prior to 1.0b8 stored the backup directory always as an absolute file. Therefore after importing a very old code convention, you should check whether this directory points to your preferred backup directory. This advice holds true even for later versions in case you’ve changed any of the default directories (backup, history, message log).
Import Checkstyle configurations
Importing Checkstyle configurations only means a best effort. There is no
guarantee that the resulting Jalopy code convention exactly matches your style
preferences because some Checkstyle modules might be ambiguous or missing at
all. E.g. take the following ParenPad module configuration:
<module name="ParenPad">
    <property name="tokens" value="METHOD_CALL" />
    <property name="option" value="nospace" />
</module>
It only defines a white space check for method call parentheses, but does not express the preference for other parentheses. It could be “space” or “nospace”. In such a case, Jalopy will assume the default value Checkstyle uses when no token is defined (“nospace” in the example).
Another common case is the <whitespaceAfter> module. Without any tokens defined, it will check for white space after three tokens (comma, semicolon, type cast parenthesis). But what if you limit the check to only two tokens (comma, semicolon)? Does it mean that no white space should appear after the right parenthesis of type casts? Or should it be allowed? Checkstyle accepts both, but Jalopy will assume that you don’t want white space after the token in such a case.
The same problem appears when a Checkstyle module is not contained in your configuration. Jalopy can’t interfere any preferences in such a case and assumes the default settings of an empty module config. In general, importing works better the more Checkstyle modules are defined. It is recommended that you test the resulting Jalopy code convention against the Checkstyle configuration after importing. Just format some source files into a temporary directory and run Checkstyle to check for any style violations. This way you can be sure that the import covered all your preferences.
To import a Checkstyle configuration, press the
Import... button and enter or select the Checkstyle configuration
that should be imported. The file dialog provides a file filter for
Checkstyle configurations, but because all configuration files use the
.xml extension, it actually doesn’t matter what file filter
is selected.
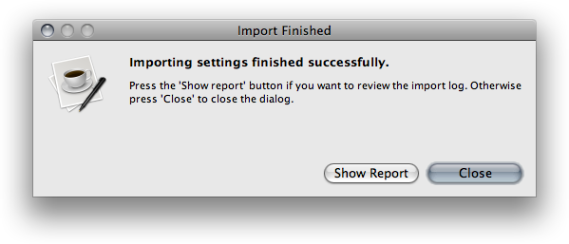
After the import has finished, a confirmation dialog appears that lets you display a report of the imported modules.
Use the Export... button to save your settings as a new code convention. Select the profiles that should be exported in the list, and press the Export... button to choose a file to export to. You may select multiple profiles that should be exported into just one file.
If a nested profile is selected, by default all parent and child profiles will be exported as well. If you really only want to export the profiles that have been selected in the list, hold down the Ctrl key when pressing the Export... button.
In order to be able to share settings across different systems and users, file paths should be stored relative to make the code convention portable. Jalopy therefore exports all file paths below its settings directory as relative file paths. History, backup and message log directories are by default set to paths below the Jalopy settings directory and are therefore correctly handled by the export. If you should have specified custom file paths here, you should check these paths and adjust them when necessary, after a code convention has been imported.
Please note that exporting only covers the actual code convention settings. All other profile data (history, backup, logs, reports) is ignored. If you really need to share all profile data, just copy the whole settings directory or selected profile folders over.
A synopsis of the used files is given in the table below.
Table 2.2. Settings files
| Name | Purpose |
|---|---|
| alias.dat | Stores the alias names of a profile |
| export.dat | Stores the file history of the last ten exported code conventions |
| history.dat | Stores the history information of all processed files |
| import.dat | Stores the file history of the last ten imported code conventions |
| log.dat | Stores the file history of the last ten log files |
| page.dat | Stores the information of the last displayed settings page |
| project.dat | Stores the information of a profile |
| settings.dat | Stores the current code convention settings |
The group of settings stored in settings.dat that describe
the style of a source file is called a code convention.
You can share code conventions using a textual XML format. See Section 2.1.1.10, “Import code convention” and Section 2.1.1.11, “Export code convention” for more
information.