Describes the steps necessary to install Jalopy.
Jalopy will run on any Pentium-class machine with a minimum of 256 MB RAM. You may succeed with less, but it’s not recommended for a good user experience. Depending on the selected options, you need between 10-20 MB free disk space for the installation files. During runtime, additional space is required for settings, caches and backup, typically between 5-50 MB, but this again depends on your project size and setup.
The supported operating systems are: Linux, Mac OS X (x86 only), Solaris, Unix, Windows XP or later. Jalopy should run on all platforms that provide a suitable Java VM.
Jalopy requires a properly configured Java JDK version 1.4 or later on your system. It is recommended to use a more recent version for best performance.
Installation should be preferably performed below your user’s home directory, when possible. If you should need to install into a different directory, please make sure that the setup wizard is invoked with sufficient user privileges.
If you choose to install any of the provided IDE plug-ins, you must close any running IDE instances prior to installation. Otherwise setup may fail, because necessary files cannot be installed or obsolete files cannot be removed.
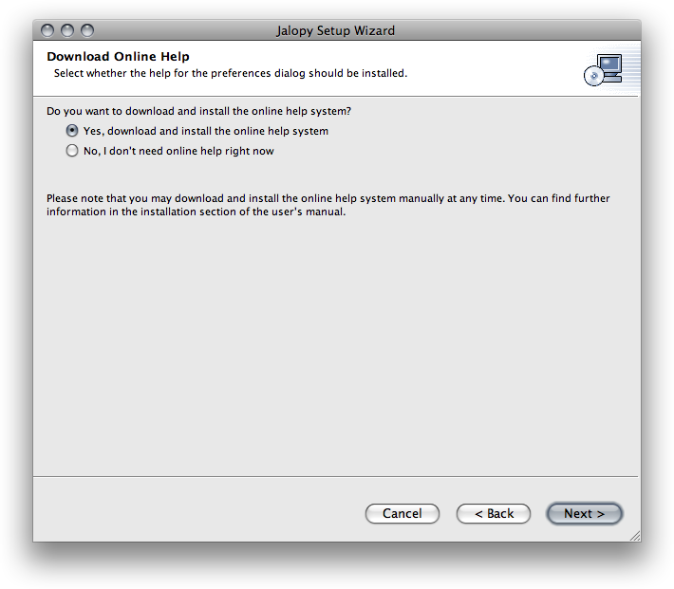
Download Online Help
During installation you will be asked whether you want to download and install
the online help for the configuration tool. If you’re installing on a machine
without Internet access, you can download the help file separately from
http://www.triemax.com/download/jalopy-help-1.9.4.jar
and either place it along the directory where the installer sits—it will then
be picked up and installed automatically by the installer. Or copy the file into
the Jalopy settings directory, e.g. on a typical Windows Vista/7 system to
C:\Users\John Doo\.jalopy\1.9.4\jalopy-help-1.9.4.jar.
You can find more information about the Jalopy settings directory in
Section 2.1, “Overview”.
The setup wizard will install the online help always into the Jalopy settings directory as
described above. But when performing a custom installation, because the software should
be available to all developers without requiring them to do any extra work on
their client machines, you can place the file into the same directory where the binaries
have been installed, e.g. if the software was installed into
C:\Program Files\jalopy,
the binaries can be found in
C:\Program Files\jalopy\lib.
Just copy the help file into this directory and it will be available to all users of the
binary.
Jalopy comes as a compressed JAR Archive (JAR) that contains all necessary application files. The JAR is executable and provides a graphical setup wizard that lets you install the software in a few easy steps. If you’re about to install Jalopy for the first time, wizard installation is highly recommended. When upgrading, if the target application directories have not changed, it is usually much simpler to perform a silent install as described in Section 1.4, “Silent Installation”.
To start the setup wizard, you may open a shell and type
% java -jar jalopy-setup-1.9.4_118.jar
at the command line. But with modern desktop systems, it is usually possible to launch the installer by just double-clicking the downloaded JAR file from within your file manager. If your system should not be configured this way, you can always resort to the manual invocation as described above.
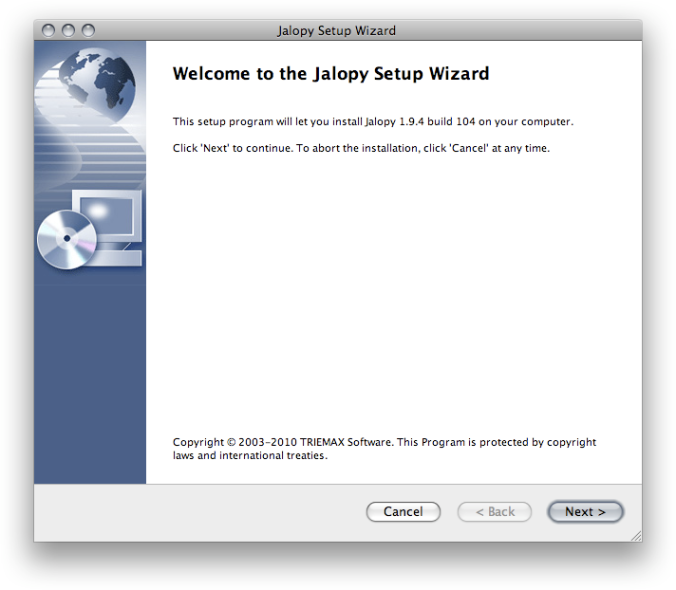
After you’ve invoked the setup wizard, the welcome screen will appear shortly.
Each wizard page contains a button bar at the bottom that provides the available page actions. To proceed to the next page, click the Next button. When available, you can press the Back button to return to the previous page and alter your selections. You can use the Cancel button at any time to abort the installation. A dialog will appear that asks for confirmation.
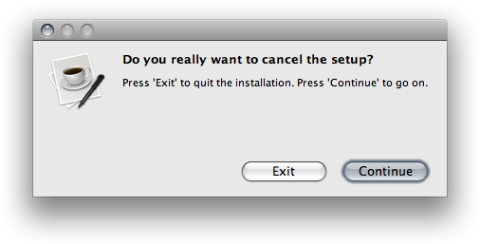
Press the Exit button to terminate the setup wizard. Press Continue to close the dialog and continue with the installation.
Pressing the Next button on the Welcome screen will display the License Agreement. Read the terms carefully!
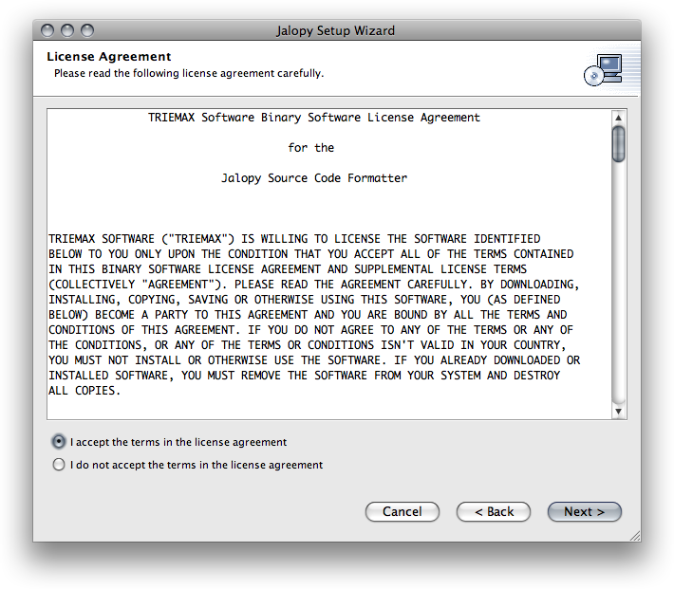
You need to accept the license agreement before you can proceed with the installation. Select the I accept the terms in the license agreement item and press the Next button to proceed.
Pressing the Next button on the License Terms page will bring up the Installation Features page that lets you select what program features setup should install and how.
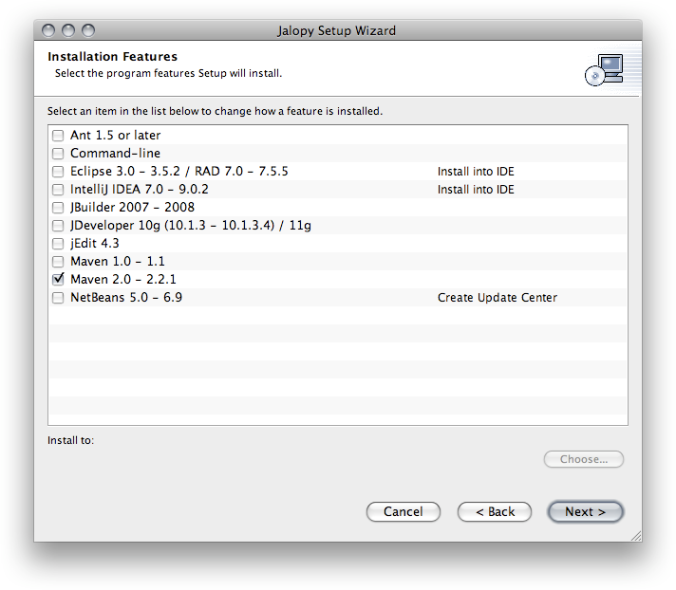
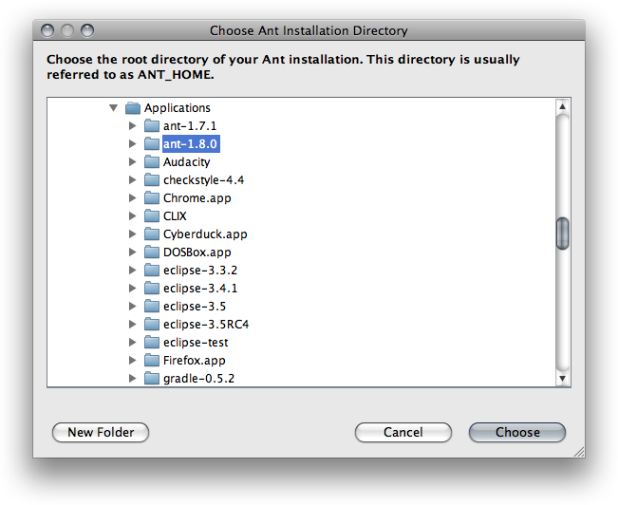
Select any of the check boxes to mark a feature for installation. When you first select a feature, a file chooser pops up that lets you select the target directory for the specific application. This is usually the root installation or settings directory of the application.
The wizard verifies your selection and ensures valid target directories. If validation should fail, a dialog pops up to inform you about the situation.
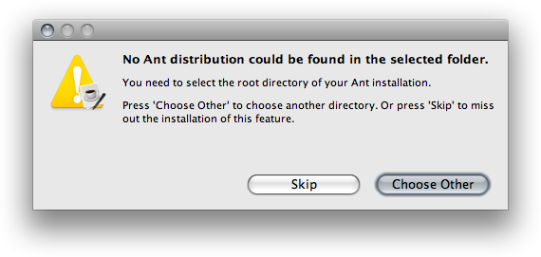
Press the Choose Other button if you want to select a different directory. Otherwise, if you want to skip the feature, you can press the Skip button to terminate the directory chooser and return to the feature selection screen (or the next directory chooser dialog).
Once a target directory has been set for a feature, it will be displayed below the feature list. You can change the target directory for a feature at any time. First select the corresponding item in the list and then use the Choose... button at the bottom to specify the target directory. Please note that when multiple check boxes are selected, multiple directory choosers will appear one after another. Don’t be confused, just look at the title of each file chooser to see what application directory is required.
Should you ever run the installer again, your choices from the last session are remembered and the screen configured accordingly. You should always check the target directories, to make sure to match the desired target applications.
Use plug-in repository
When it comes to deployment within teams, it can be more convenient to leverage the plug-in manager of the IDE instead of distributing a custom installer. Jalopy therefore lets you create IDE specific bundles that may be installed using the IDE specific provisions. To change the installation target to the IDE specific format, click the current target item behind the installation feature and choose one of the available options.
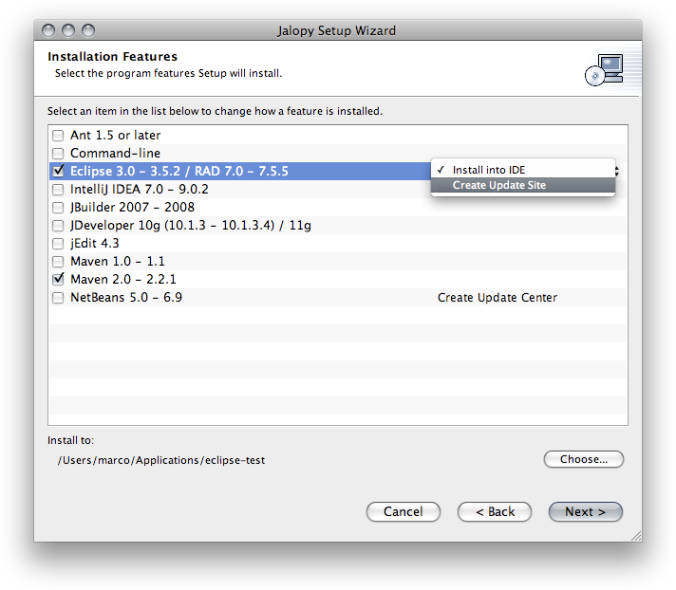
When the installation target has been set to the application specific plug-in manager format, the installer will create a setup bundle in the specified directory, but the plug-in itself won’t be installed into the target application. You will need to use the IDE plug-in manager to perform plug-in installation after the setup wizard has finished.
When the installer can connect with the Internet, and no up-to-date help can be found on your system, you will be presented with the option to download and install the online help bundle for the GUI.
It is recommended to let the installer handle help installation, but when you’re installing on a machine without Internet access, you can download the help file separately from http://www.triemax.com/download/jalopy-help-1.9.4.jar and either place it along the directory where the installer sits—it will then be picked up and installed automatically by the installer (the Download Online Help screen does not appear in such a case).
Or copy the file into the Jalopy settings directory, e.g. on a typical Windows Vista/7
system to
C:\Users\John Doo\.jalopy\1.9.4\jalopy-help-1.9.4.jar.
General information about the Jalopy settings directory can be found in
Chapter 2, Configuration.
In case an older Jalopy release could be found on your machine, the wizard lets you choose whether the settings of the prior version should be imported during installation.
Please note that the settings of the Jalopy Open Source versions up to 1.0b11 are always removed during installation. If you want to keep such settings, make a backup of your settings directory before you start the setup routine. Detailed information about the Jalopy settings system can be found in Chapter 2, Configuration
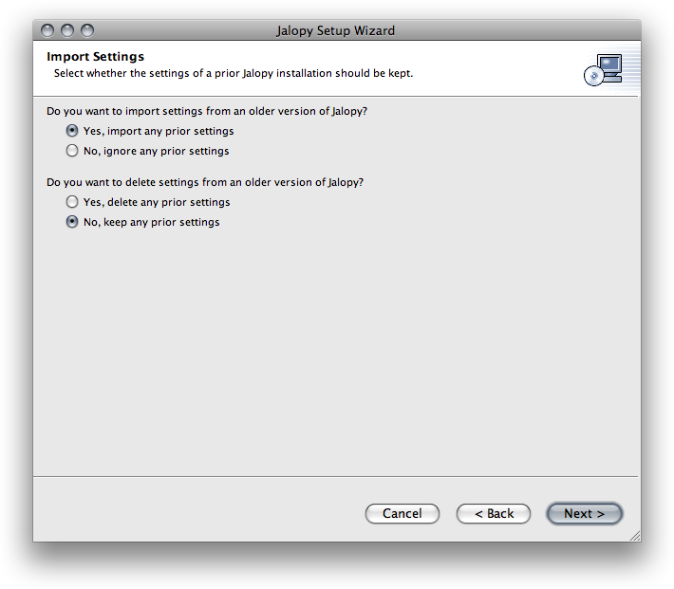
Select the Yes, import my settings option to have your settings imported or No, ignore any prior settings to start with the defaults. Additionally, you can control whether your prior settings should be deleted or kept. Select Yes, delete any prior settings to delete your existing settings. Or choose No, keep any prior settings to leave any present settings untouched.
The installer lets you pre-configure some IDE plug-in preferences, to possibly eliminate the need for client configuration.
When using Jalopy in a team, it is often mandatory to share a common code convention to achieve a consistent code layout style. There are multiple ways to achieve this goal, but the best and most convenient approach is to embed this information right into the IDE plug-ins. This way developers must not know nor care how to configure Jalopy—it will automatically pick up its settings upon first installation. You can of course adjust the defaults later using the IDE preferences dialog.
The specified defaults only apply for the IDE plug-ins (Eclipse, IntelliJ IDEA, JDevelper, jEdit and NetBeans). You still have to configure the headless plug-ins explicitly, which is more appropriate for their use cases
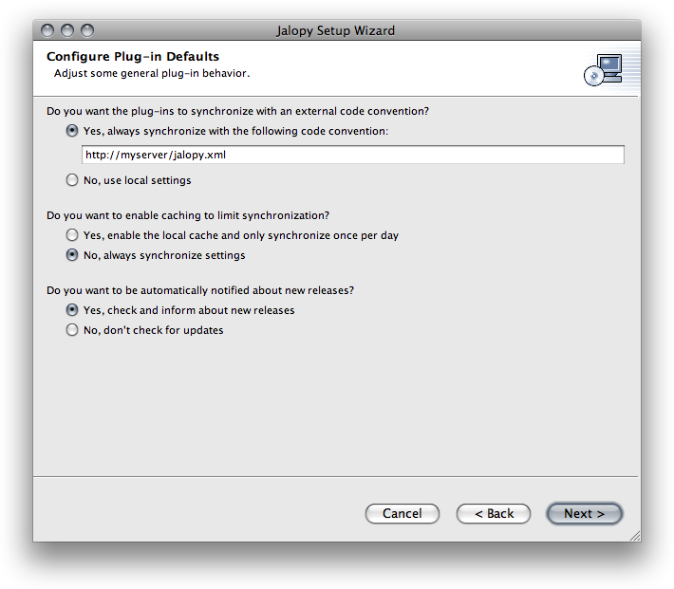
To specify a shared code convention, select the Yes, always synchronize with the following code convention radio button and enter the path of the shared code convention. This can either be a file system path or a web url.
By default, Jalopy checks the specified settings file for changes each time it is about to format. This can be prohibitive when the code convention sits on a server without fast network access. To avoid long delays in such situations, you can enable local caching. Jalopy then only checks once per day for changes. To enable local caching, select the Yes, enable the local cache and only synchronize once per day radio button.
In order to keep keep track of updates, the IDE plug-ins can notify about the availability of new releases. When a new release becomes available, a notification pop-up is displayed that provides access to the release notes. If you don’t want to be automatically notified about updates, select the No, don’t check for updates radio button.
When all configuration is done, the installation summary dialog is displayed. Please review your choices and press the Install button to start the installation.
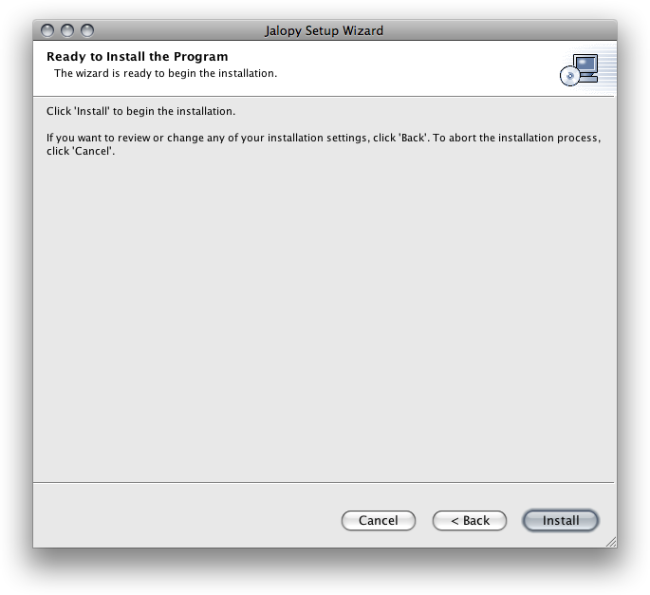
Please note that installation cannot be canceled once started. You should make sure that you’ve selected all desired features and configured the target locations correctly before you start the installation. You can of course, re-run the installer at any time in case you need to perform installation with different settings. If you think that you’ve made a wrong choice during the information gathering, press the Back button to flip through the pages and review your settings
Once the installation has started, a progress dialog informs you about the pending installation steps.
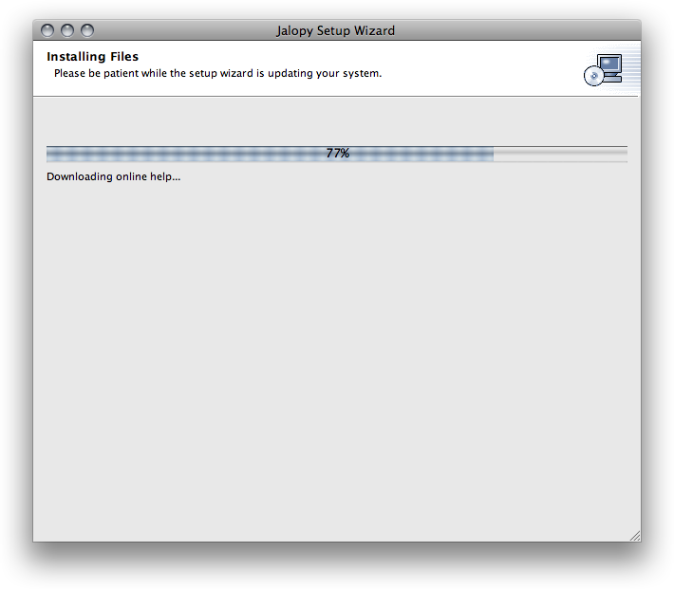
The installation process might take a while, please be patient until the installer has finished updating your system. Especially the installation of the Eclipse plug-in can be very time consuming on big installations and take several minutes.
When installation has finished, the final screen appears and informs you about the installation status.
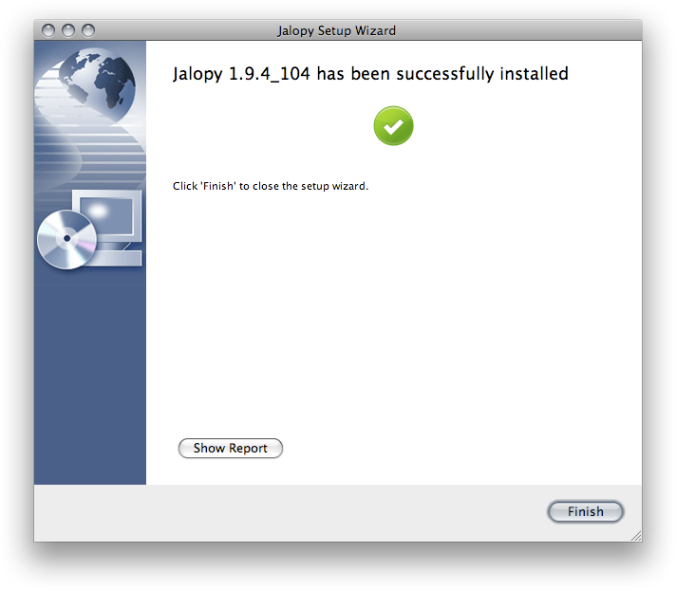
You can press the Show Report button to review the installation log. In case something should have went wrong during the installation, please provide support with this log information. Press the Finish button to close the setup wizard.
The executable JAR file contains built-in support for silent (unattended) installation. A normal wizard install guides you through different graphical dialog boxes and expects some input. However, a silent install does not prompt for input. Instead it receives the required setup data from a configuration driver file that provides the information one would otherwise enter as responses to dialog boxes.
The setup configuration driver file uses the standard java.util.Properties format. It consists of key/value pairs representing the data entries. Performing a wizard install automatically creates (or updates) a configuration driver file in the Jalopy settings directory that reflects the information given during the last setup session.
To perform a silent install, open a shell and type
% java -jar jalopy-setup-1.9.4_118.jar --silent
at the command line. This will perform installation with the data gathered from your last installation session. But the installer supports a few more options to control the setup process. These are described below.
Options
Table 1.1. Install Wizard command-line options
| Option | Long Option | Arguments | Description | Since |
|---|---|---|---|---|
| -c | --config | <filepath> |
Specifies the absolute path to the setup configuration driver file to use for
the installation, e.g.
/home/John Doo/tools/jalopy-install.ini. When omitted,
the settings of the last installation run will be used when available
| 1.4 |
| -h | --help | Displays a short help | 1.4 | |
| -l | --log | Specifies the directory where the log file should be written. When omitted, the log file is stored in the Jalopy settings directory (Section 2.1, “Overview”) | 1.4 | |
| --plugin-repo | Creates an IntelliJ IDEA plugin repository | 1.9.3 | ||
| -s | --silent | Performs silent installation | 1.4 | |
| --update-center | Creates a NetBeans update center | 1.9.2 | ||
| --update-site | Creates an Eclipse update site | 1.9.2 |
Below you find an annotated sample configuration driver file, that explains all available keys and the possible values.
Example 1.1. Sample configuration driver file
#Jalopy installation data        ❶
#Fri Jul 23 09:14:37 CET 2010

delete.settings=false            ❷
import.settings=true             ❸
install.ant=true                 ❹
install.ant.dir=/Home/John Doo/Applications/ant-1.8.1 ❺
install.console=true
install.console.dir=/Home/John Doo/Applications/jalopy
install.eclipse=true
install.eclipse.dir=/Home/John Doo/Applications/eclipse-3.6
install.idea=true
install.idea.dir=/Home/John Doo/Applications/idea-9.0
install.jdeveloper=true
install.jdeveloper.dir=/Home/John Doo/Applications/jdeveloper-11.1.1.3.0
install.jedit=true
install.jedit.dir=/Home/John Doo/Applications/jedit-4.3
install.maven=true
install.maven.dir=/Home/John Doo/.m2
install.netbeans=true
install.netbeans.dir=/Home/John Doo/Applications/netbeans-6.9
sync.cacheConvention=false                            ❻
sync.convention=http://itn.company.com/jalopy.xml     ❼
update.enabled=true                                   ❽
Header comment that contains the last modification date of the file | |
Indicates whether the settings of a prior version should be removed. Possible values: true|false. “true” to remove older settings, “false” to keep them | |
Indicates whether the settings of a prior version should be imported. Possible values: true|false. “true” to import prior settings, “false” to ignore them | |
Indicates whether the specified application plug-in should be installed. The different target applications are specified via separate install.[appKey] = [value] entries. Valid appKeys are ant, console, eclipse, idea, jbuilder, jdeveloper, jedit, netbeans, maven. Valid values: true|false. “true” installs the plug-in, “false” means that the plug-in won’t be installed | |
Specifies the absolute file path of the root application directory of the target application. The different target application directories are specified via separate install.[appKey].dir = [PATH] entries. For the valid appKeys see “install.[appKey]”. The file path is stored in platform notation | |
| Indicates whether the IDE plug-ins should perform settings synchronization only once per day. Possible values: true|false. “true” to perform synchronization only once per day, “false” to perform synchronization on each formatting run. Requires a sync.convention to be specified in order to take affect | |
Specifies the path to the exported code convention the IDE plug-ins should synchronize with. Possible values: file path or empty. A valid file path to have the IDE plug-ins synchronize their settings, left empty if no synchronization should be performed | |
Indicates whether the IDE plug-ins should check for updated releases. Possible values: true|false. “true” to enable automatic update checking, “false” if no update checking should be performed |
It is often possible to install Jalopy manually yourself, but this might require certain non-trivial tasks, especially for the IDE plug-ins. It is therefore recommended to at least initially use the installer to perform installation on a test system and extract the necessary information for your custom deployment procedure. Please contact support if you need any specific assistance.
Wizard installation is mandatory with the trial version